- Developer Guide
- SDK Integration (Previous)
- Android SDK (Previous)
Android SDK (Previous)

Add the following repository under the allproject/repositores block in your project/build.gradle file.
allprojects {
    ...
    repositories {
        ...
        maven { url "https://sdk-download.airbridge.io/maven" }
        ...
    }
    ...
}
If you're using Android Studio Arctic Fox (2020.3.1) or a later version to create the project or if the repository settings are set up within the settings.gradle file, add the following code to the project/settings.gradle file under the dependencyResolutionManagement/repositories block.
dependencyResolutionManagement {
    ...
    repositories {
        ...
        maven { url "https://sdk-download.airbridge.io/maven" }
        ...
    }
    ...
}
Add the following code to the dependencies block in your app/build.gradle file.
dependencies {
    ...
    implementation "io.airbridge:sdk-android:2.+"
    ...
}The Airbridge SDK uses JetBrains' Kotlin and Coroutines libraries for enhanced stability and productivity.
If you install the SDK manually using an .aar file, add the following dependency libraries in your project.
Note
Airbridge Android SDK requires Kotlin stdlib and Kotlinx coroutines library version 1.4 or later.
Starting from Airbridge Android SDK version 2.24.2, the Play Services Appset library dependency for appSetId collection must be added.
Attention
Starting from Airbridge Android SDK version 2.26.1, the BillingClient library dependency for collecting In-App purchase details collection must be added.
Please refer to the BillingClient dependency for troubleshooting
Add the following permissions to your AndroidManifest.xml file.
<manifest ...>
  ...
  <uses-permission android:name="android.permission.INTERNET" />
  <uses-permission android:name="android.permission.ACCESS_NETWORK_STATE" />
  ...
</manifest>Add the following code under the onCreate method of the Application class file registered in the AndroidManifest.xml file.
@Override
public void onCreate() {
    super.onCreate();
    AirbridgeConfig config = new AirbridgeConfig.Builder("YOUR_APP_NAME", "YOUR_APP_SDK_TOKEN")
        .build();
    Airbridge.init(this, config);
}override fun onCreate() {
super.onCreate()
val config = AirbridgeConfig.Builder("YOUR_APP_NAME", "YOUR_APP_SDK_TOKEN")
.build()
Airbridge.init(this, config)
}Attention
Make sure that the
initalizeSDKfunction is called within theonCreatemethod of theApplicationclass for proper functionality.
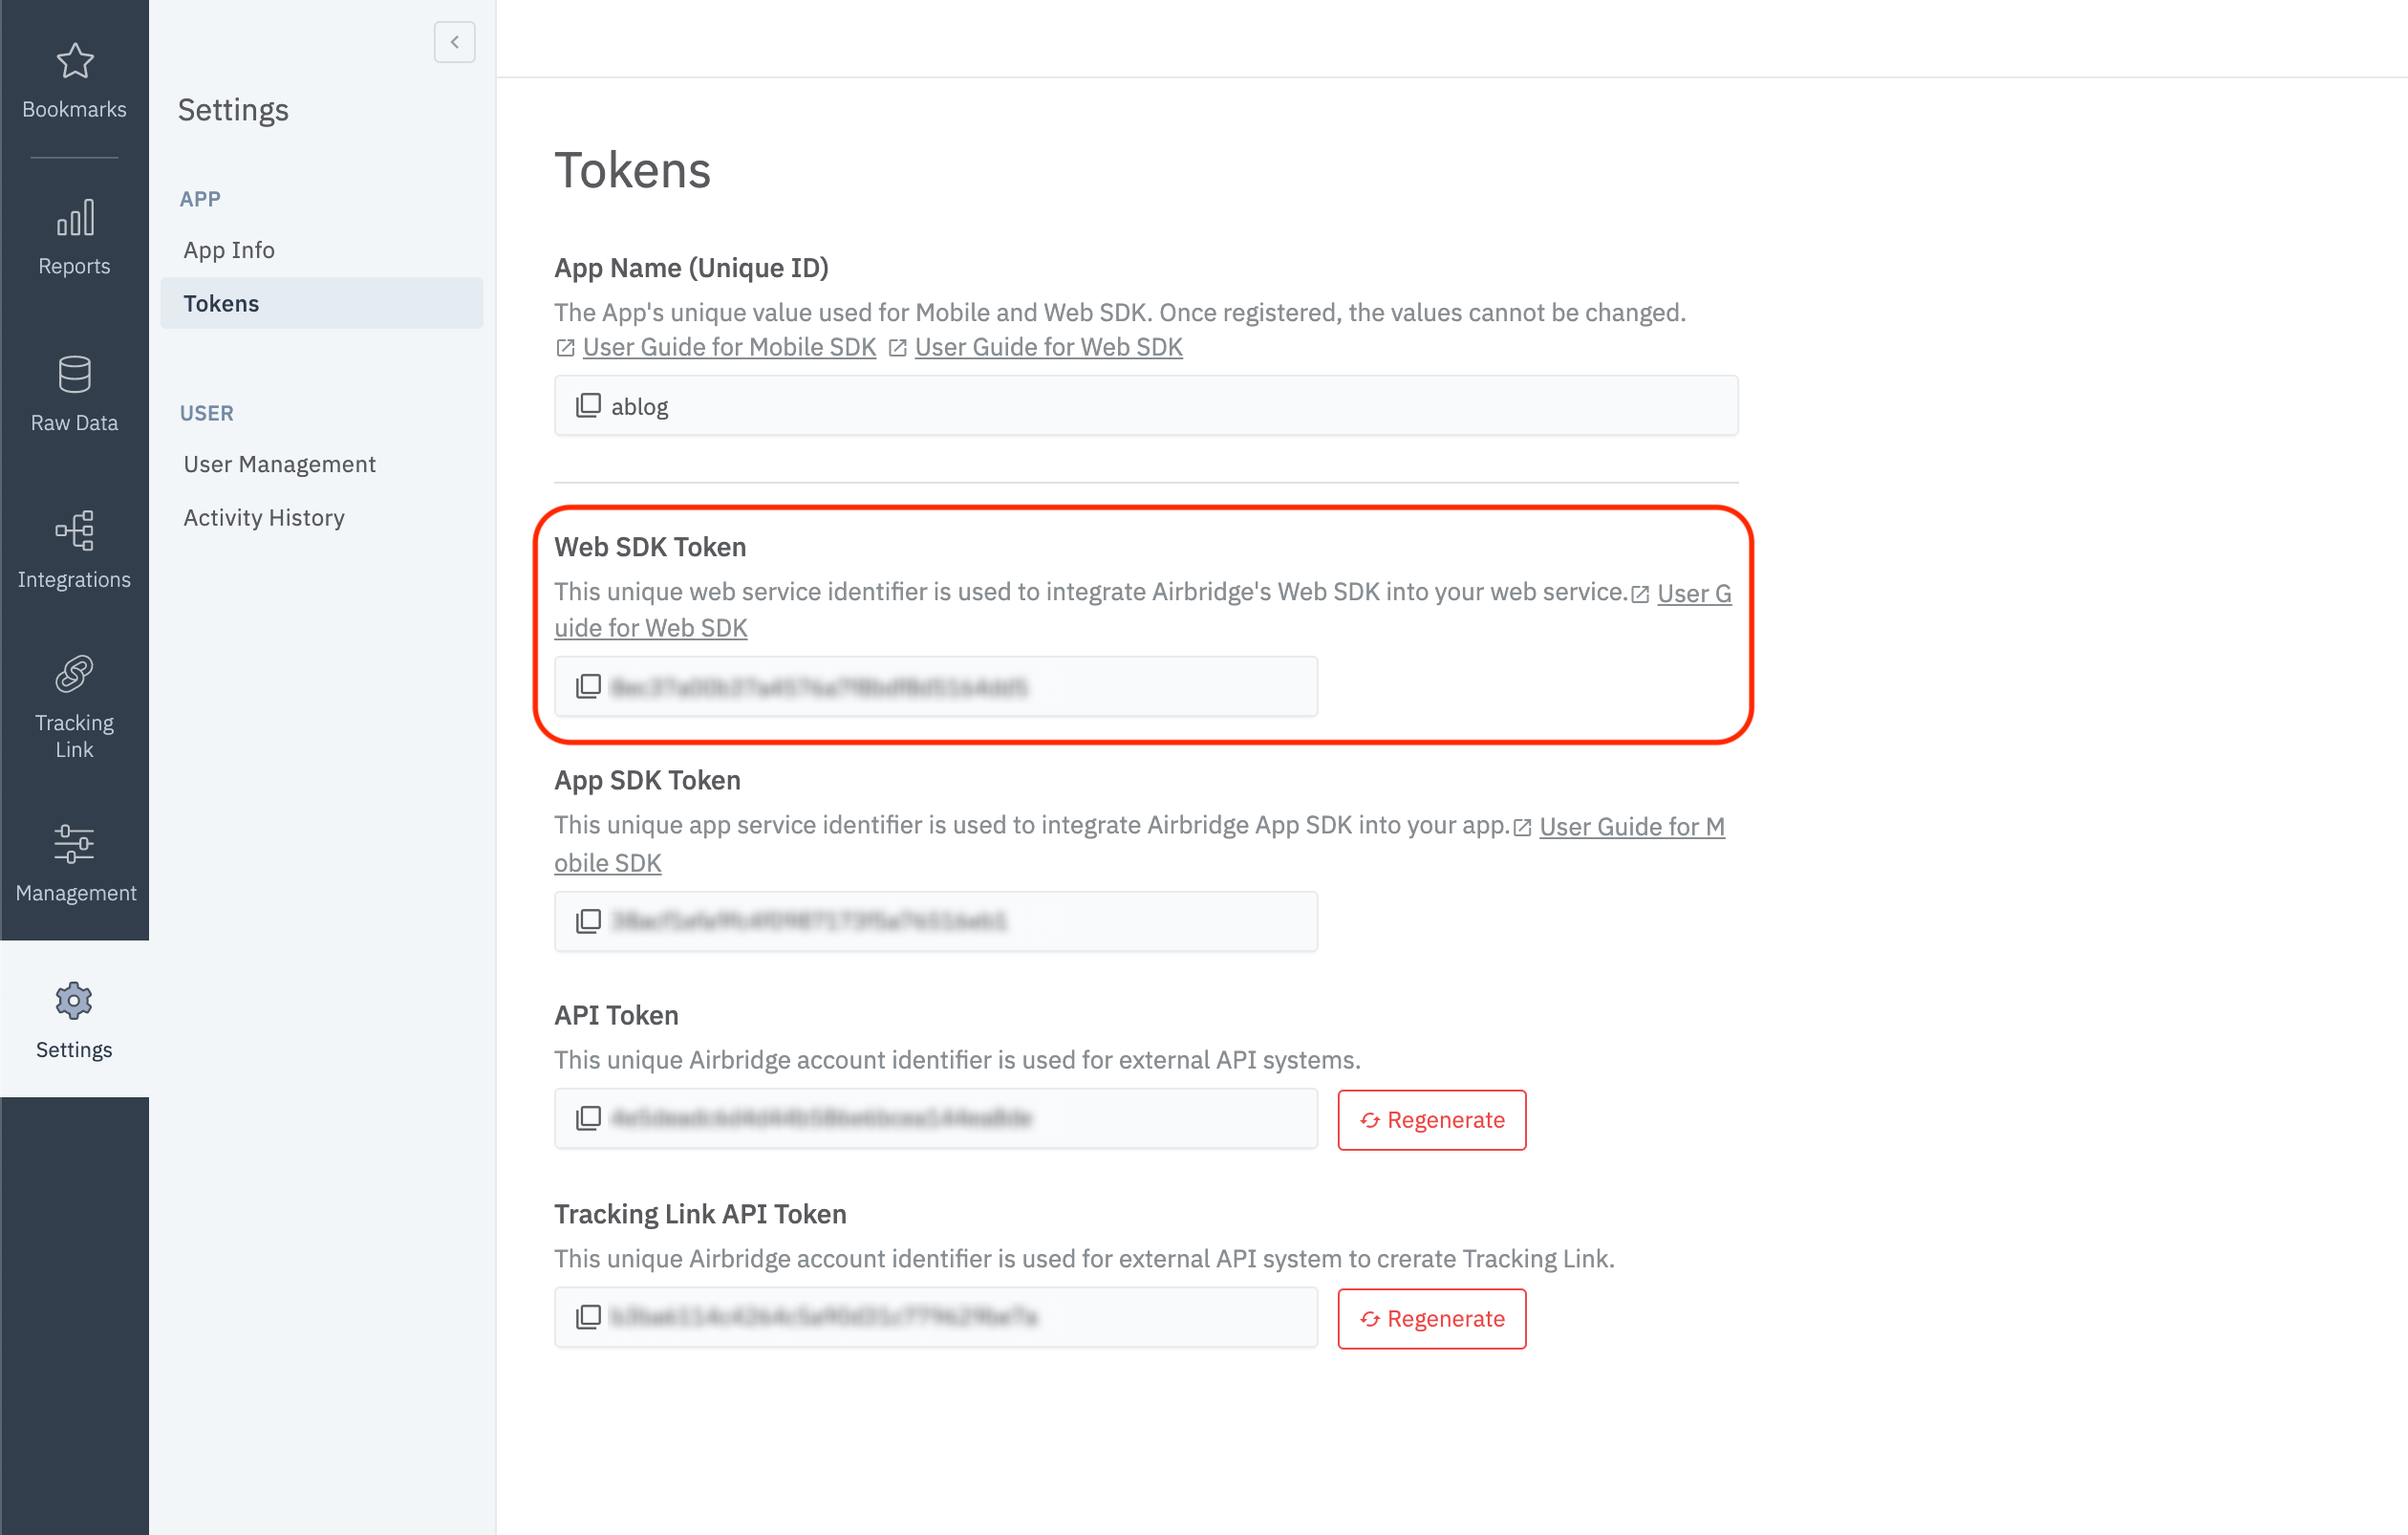
The YOUR_APP_NAME and YOUR_APP_SDK_TOKEN can be found at [Settings]>[Tokens] in the Airbridge dashboard.

After completing the Airbridge Android SDK setup, you can test whether it works properly by following the methods below.
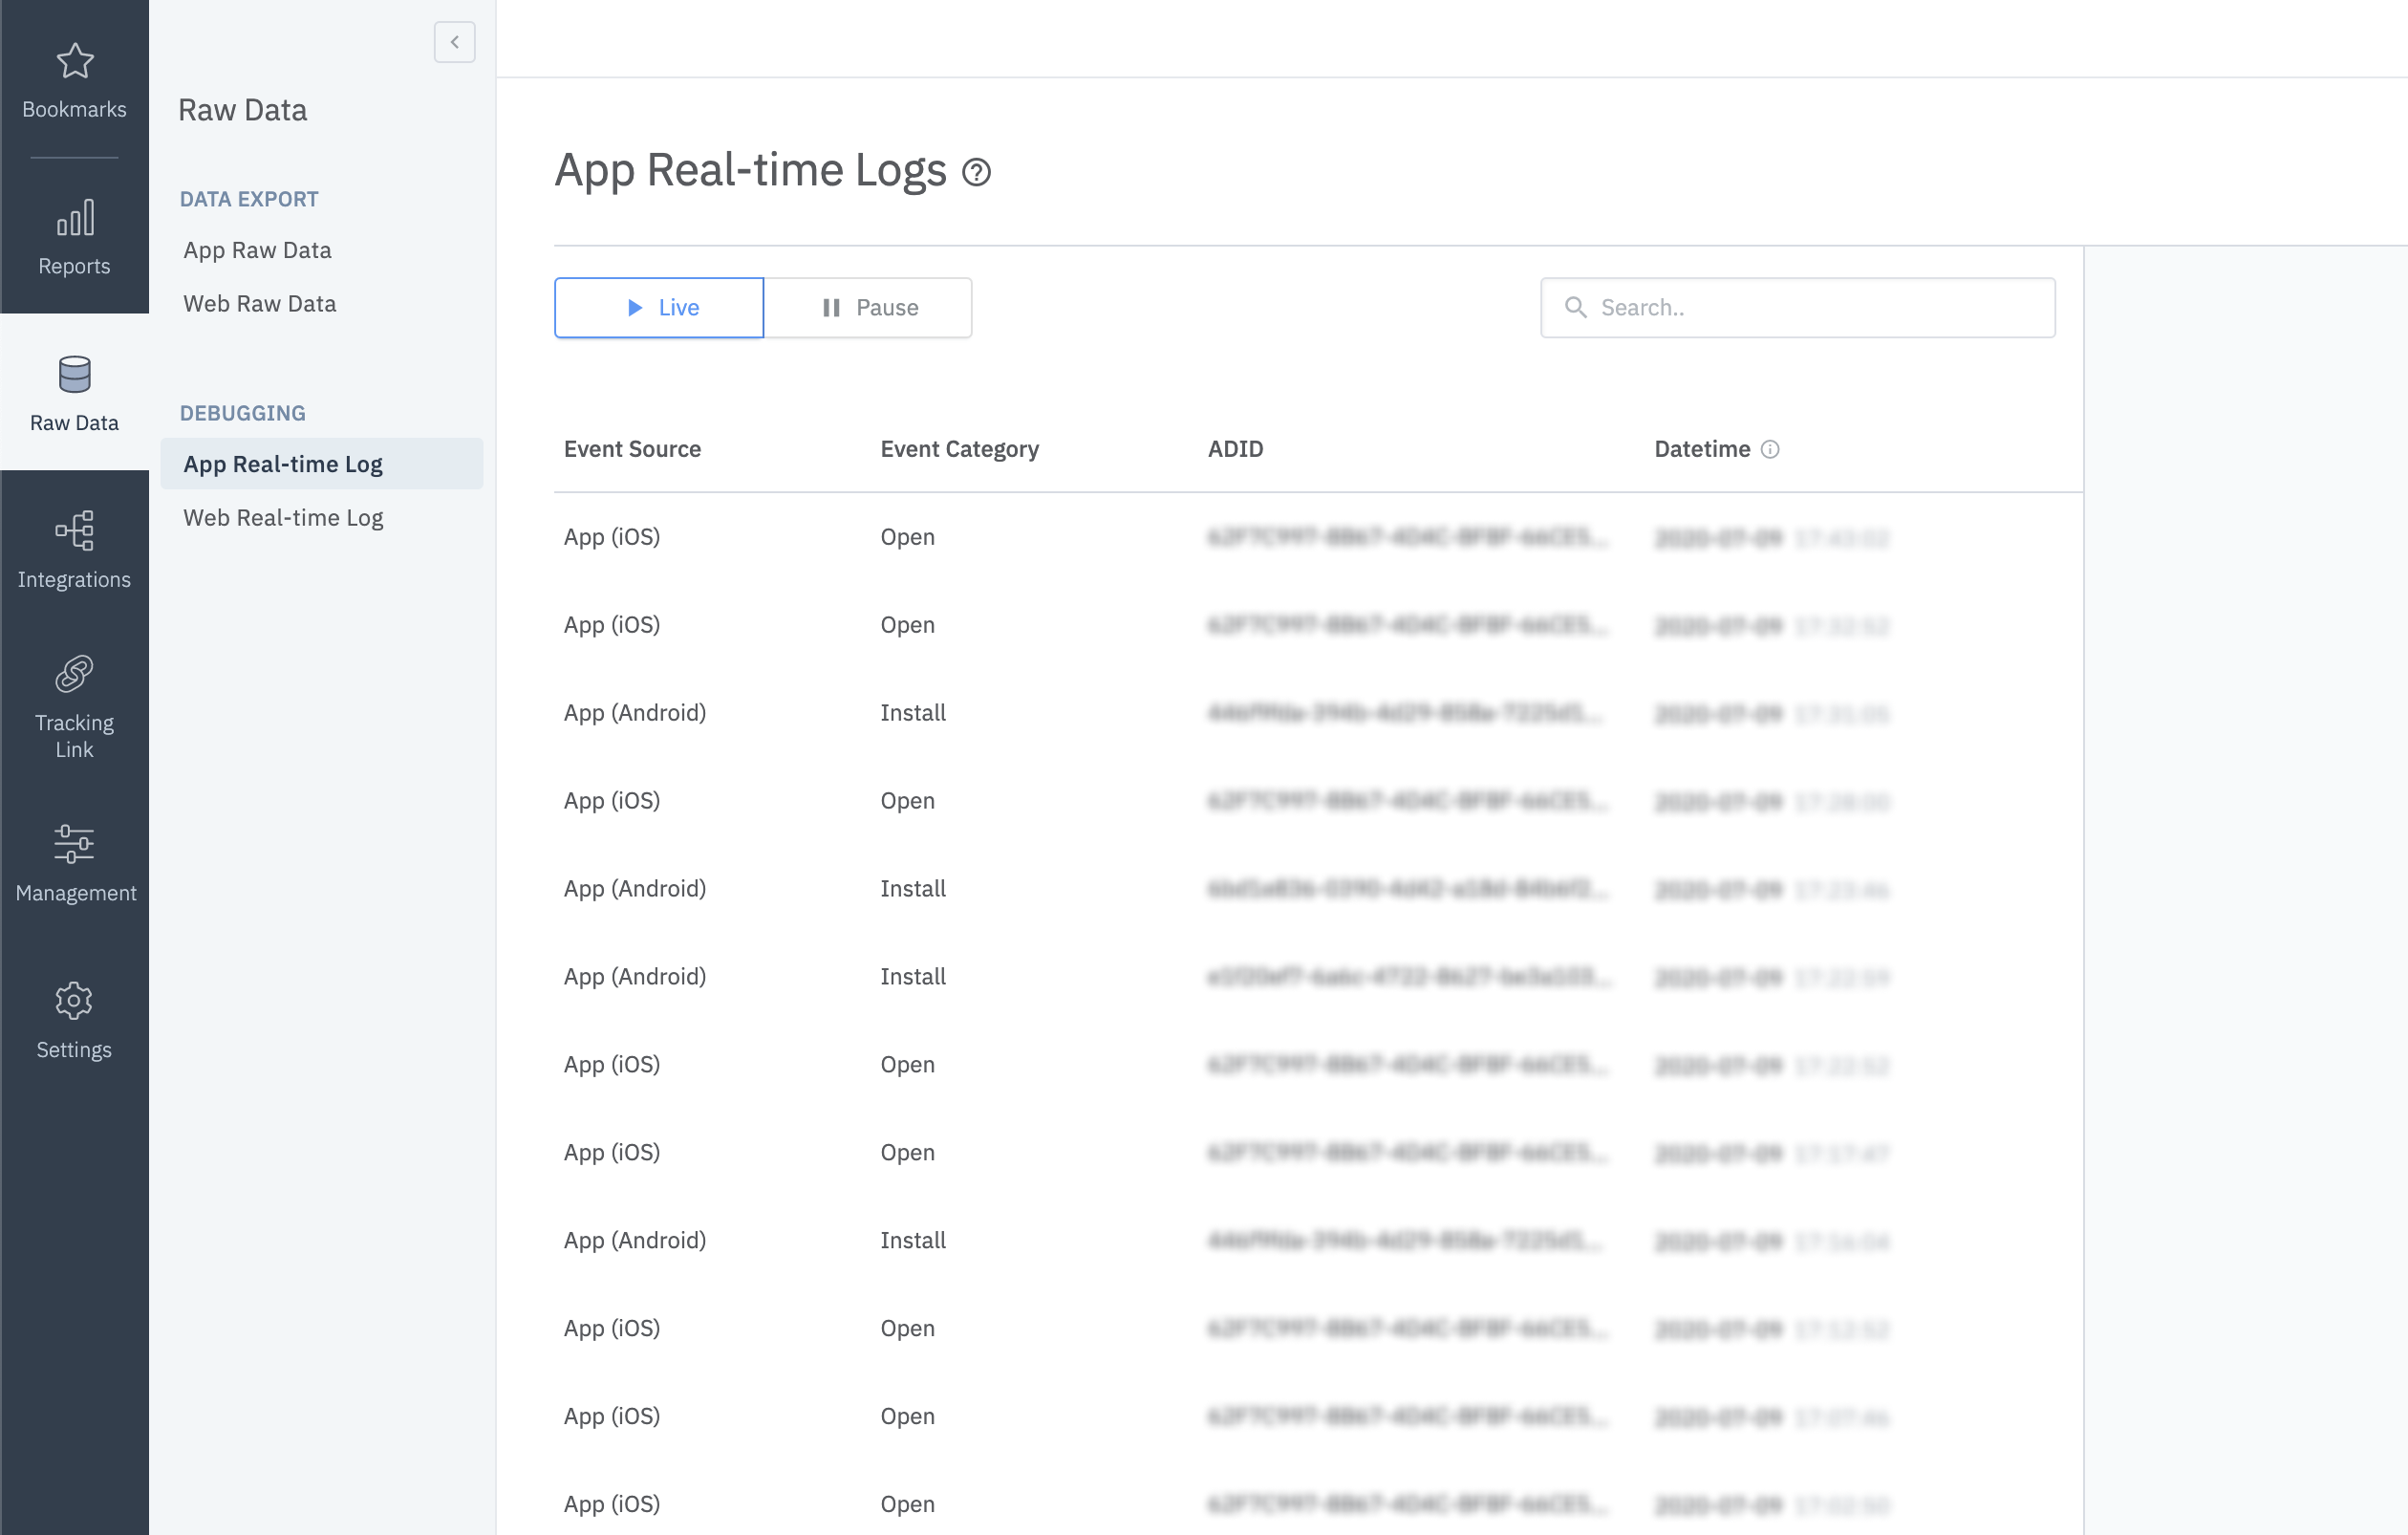
Install and open the app on a test device.
Navigate to [Raw Data]>[App Real-time Logs] in the Airbridge dashboard.
Enter the Google Advertising ID (GAID) of the test device into the search bar to find it in the logs.
It may take up to 5 minutes for the logs to be visible in the dashboard.
If you can't find the Install event in the Event Category column with the Google Advertising ID of the test device, check again whether the SDK is installed properly as instructed.
The Google Advertising ID (GAID) of an Android device can be found at [Settings]>[Google]>[Ads].
Use the following method if you want to use LogCat to see a more detailed log of the app.
Attention
As this method may expose user information, ensure it is only executed for cases of
Build.DEBUG.
// Default log level = Log.INFO
AirbridgeConfig config = new AirbridgeConfig.Builder("YOUR_APP_NAME", "YOUR_APP_SDK_TOKEN")
    .setLogLevel(Log.DEBUG)
    .build();
Airbridge.init(this, config);// Default log level = Log.INFO
val config = AirbridgeConfig.Builder("YOUR_APP_NAME", "YOUR_APP_SDK_TOKEN")
.setLogLevel(Log.DEBUG)
.build()
Airbridge.init(this, config)
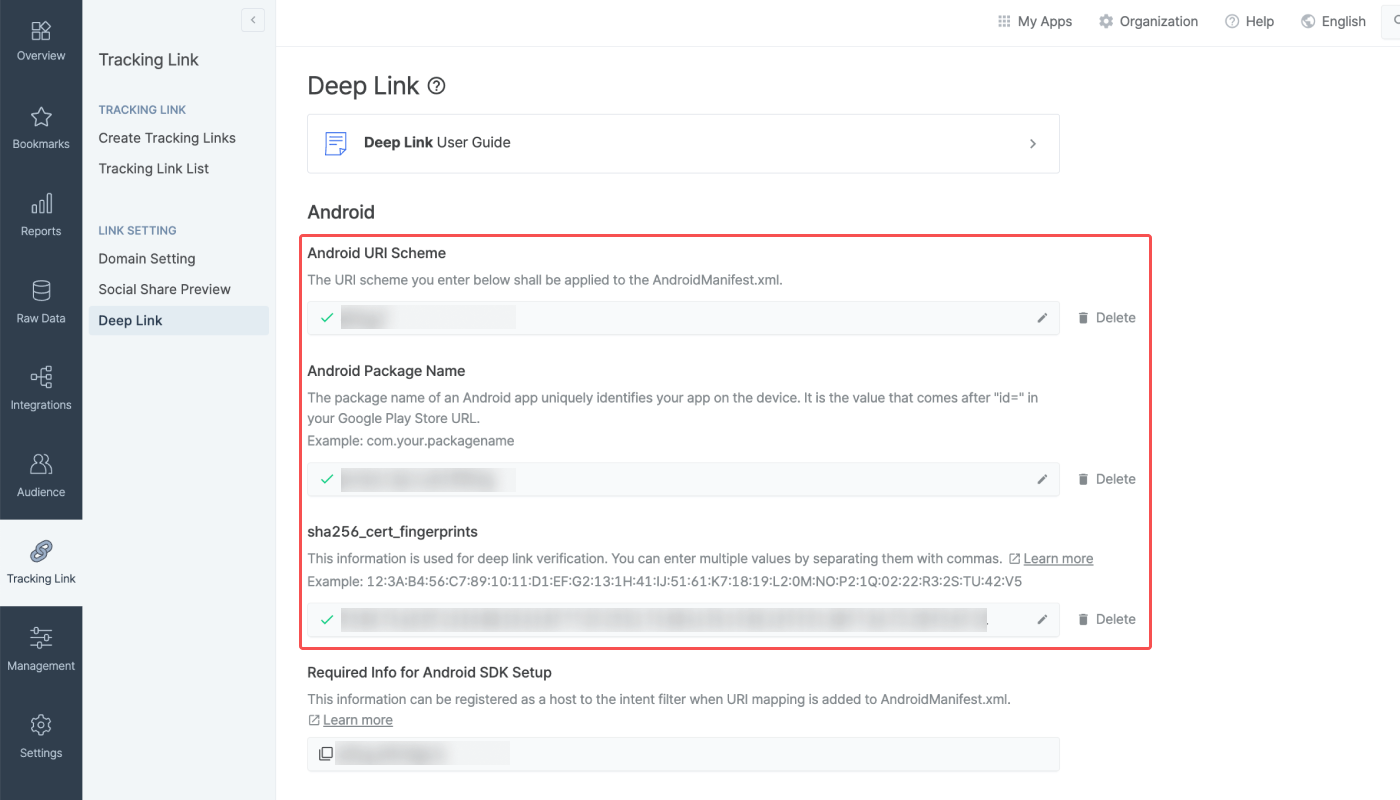
The following information must be submitted to the [Tracking Link]>[Deep Link] page in the Airbridge dashboard.
URI Scheme
Package Name
sha256_cert_fingerprints
Enter the Android URI scheme, including ://, into the URI Scheme field. Only lowercase letters, numbers, -, and + are supported.
Attention
To redirect users as intended, submit the URI scheme differently for the production app and the development app.
The package name field of the production app that is already released on app stores will be automatically filled.
The package names field of the development app and production app that has not been released on app stores yet must be filled manually.
Follow the steps below to obtain the sha256_cert_fingerprints.
Prepare the
keystorefile that you used to register your app with the Google Play Store.Execute the following command in the Terminal.
keytool -list -v -keystore my-release-key.keystore3. Copy the SHA256 value under the Certificate Fingerprints section and paste it into the Android sha256_cert_fingerprints field in the Airbridge dashboard.
Certificate fingerprints:
    MD5:  4C:65:04:52:F0:3F:F8:65:08:D3:71:86:FC:EF:C3:49
    SHA1: C8:BF:B7:B8:94:EA:5D:9D:38:59:FE:99:63:ED:47:B2:D9:5A:4E:CC
    SHA256: B5:EF:4D:F9:DC:95:E6:9B:F3:9A:5E:E9:D6:E0:D8:F6:7B:AB:79:C8:78:67:34:D9:A7:01:AB:6A:86:01:0E:99
Multiple
sha256_cert_fingerprintscan be entered by separating them with commas.
If you are using the Airbridge Android SDK v2.21.1 or later, follow the steps below to set up the intent filter. If you are using the Airbridge Android SDK v2.21.0 or earlier, refer to this section of this document.
Open the
AndroidManifest.xmlfile.Add the following
intent-filterto theactivitythat will process deep links.
<activity ...>
    ...
    <intent-filter android:autoVerify="true">
        <action android:name="android.intent.action.VIEW" />

        <category android:name="android.intent.category.DEFAULT" />
        <category android:name="android.intent.category.BROWSABLE" />

        <data android:scheme="http" android:host="YOUR_APP_NAME.abr.ge" />
        <data android:scheme="https" android:host="YOUR_APP_NAME.abr.ge" />
    </intent-filter>
    <intent-filter android:autoVerify="true">
        <action android:name="android.intent.action.VIEW" />

        <category android:name="android.intent.category.DEFAULT" />
        <category android:name="android.intent.category.BROWSABLE" />

        <data android:scheme="http" android:host="YOUR_APP_NAME.airbridge.io" />
        <data android:scheme="https" android:host="YOUR_APP_NAME.airbridge.io" />
    </intent-filter>
    <intent-filter>
        <action android:name="android.intent.action.VIEW" />

        <category android:name="android.intent.category.DEFAULT" />
        <category android:name="android.intent.category.BROWSABLE" />

        <data android:scheme="YOUR_APP_URI_SCHEME" />
    </intent-filter>
    ...
</activity>YOUR_APP_NAME.deeplink.page: Airbridge App Links Version 2YOUR_APP_NAME.airbridge.io: Airbridge App Links Version 1YOUR_APP_URI_SCHEME: deep link using URI Scheme
To process the deep link of the intent filter added to the activity, the following setup is required.
@Override
protected void onResume() {
    super.onResume();
    Airbridge.getDeeplink(getIntent(), new AirbridgeCallback<Uri>() {
        @Override
        public void onSuccess(Uri uri) {
            // Process deeplink data
        }

        @Override
        public void onFailure(Throwable throwable) {
            // Error
        }

        @Override
        public void onComplete() {
            // After process deeplink data
        }
    });
}

// The code below is required for proper deeplink processing
@Override
protected void onNewIntent(Intent intent) {
    super.onNewIntent(intent);
    setIntent(intent);
}override fun onResume() {
super.onResume()
Airbridge.getDeeplink(intent, object : AirbridgeCallback<Uri> {
override fun onSuccess(uri: Uri) {
// Process deeplink data
}
override fun onFailure(throwable: Throwable) {
// Error
}
override fun onComplete() {
// After process deeplink data
}
})
}
// The code below is required for proper deeplink processing
override fun onNewIntent(intent: Intent?) {
super.onNewIntent(intent)
setIntent(intent)
}To process a deferred deep link in the Airbridge SDK, the intent filter setup in the AndroidManiest.xml file automatically calls the corresponding activity. The process is the same as the deep link callback.
If you don't want the deferred deep link to automatically call the corresponding activity or want to handle a specific task with the information obtained through the deferred deep link, you can use the following method.
AirbridgeConfig config = new AirbridgeConfig.Builder("YOUR_APP_NAME", "YOUR_APP_SDK_TOKEN")
    .setOnDeferredDeeplinkReceiveListener(new OnDeferredDeeplinkReceiveListener() {
        @Override
        public boolean shouldLaunchReceivedDeferredDeeplink(Uri uri) {
            // If you want to open the target activity, please return true otherwise false
            // Default returning value = true
            return true;
        }
    })
    .build();
Airbridge.init(this, config);val config = AirbridgeConfig.Builder("YOUR_APP_NAME", "YOUR_APP_SDK_TOKEN")
.setOnDeferredDeeplinkReceiveListener(object : OnDeferredDeeplinkReceiveListener {
override fun shouldLaunchReceivedDeferredDeeplink(uri: Uri): Boolean {
// If you want to open the target activity, please return true otherwise false
// Default returning value = true
return true
}
})
.build()
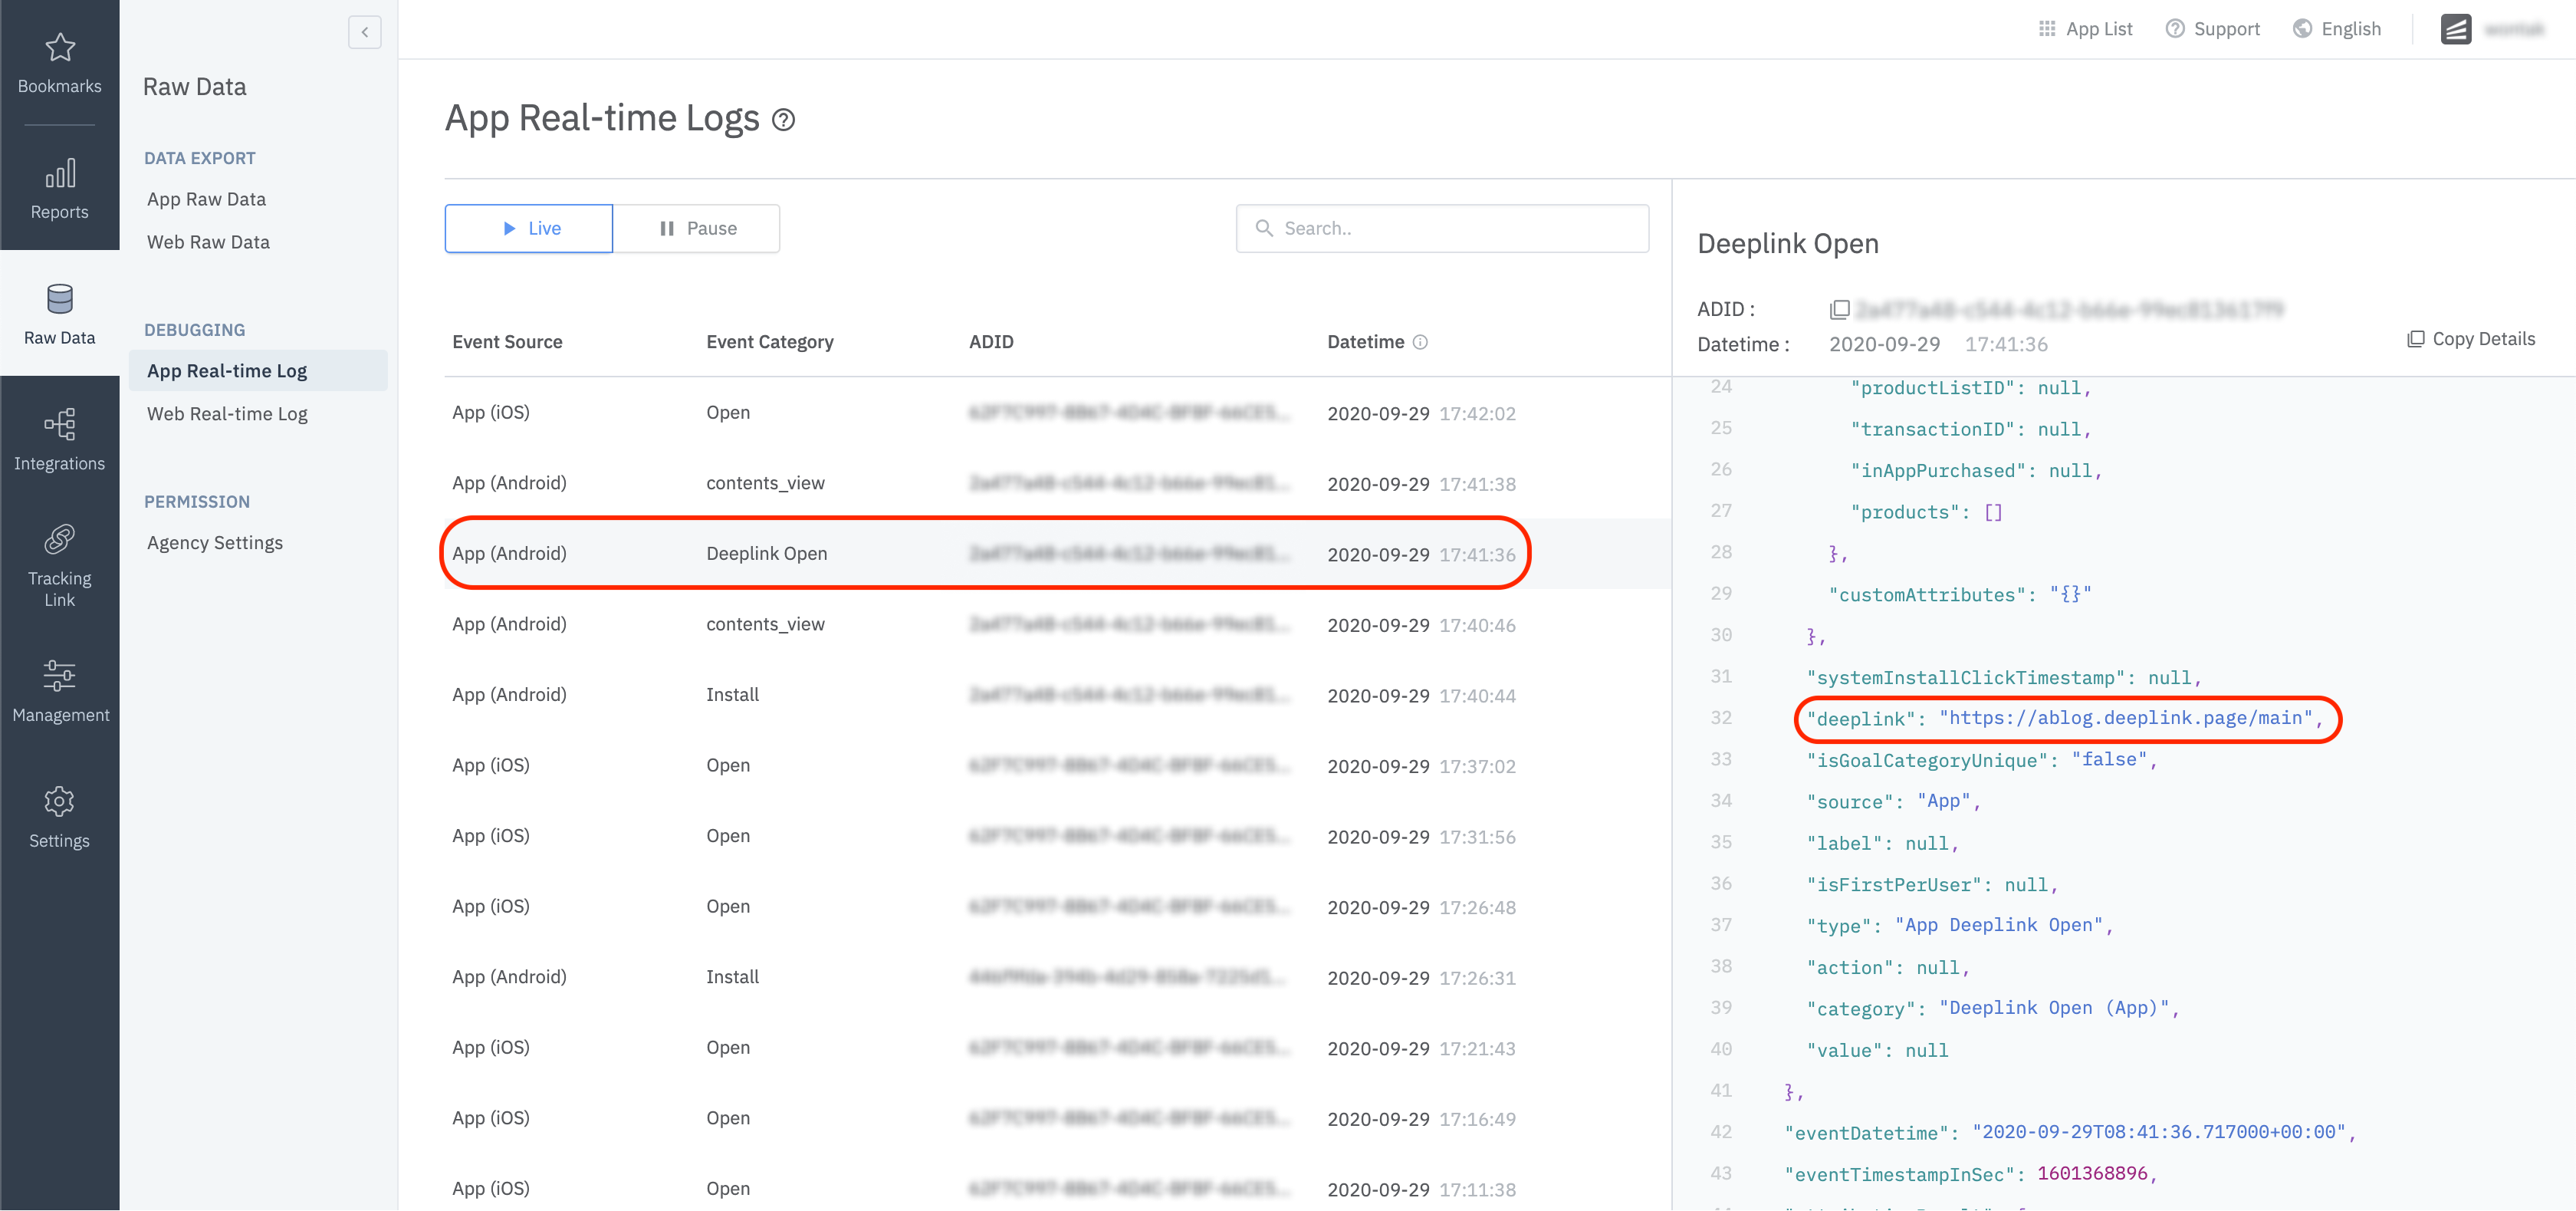
Airbridge.init(this, config)Click on your URI scheme to test if your deep link has been properly set up in the Airbridge SDK.
YOUR_APP_URI_SCHEME://
When the deep link setup is successful, you will see the Deeplink Open event on the [Raw Data]>[App Real-time Log] page in the Airbridge dashboard, like in the following image.
Please refer to the user guide and enter the custom domain in the dashboard.
Create the
res/values/airbridge.xmlfile and add the custom domain as follows.123456<?xml version="1.0" encoding="utf-8"?> <resources xmlns:tools="http://schemas.android.com/tools"> <string-array name="co_ab180_airbridge_custom_domains"> <item>YOUR_APP_CUSTOM_DOMAIN</item> </string-array> </resources>Add the custom domain you configured earlier to the
Intent Filterof theAcitivtythat handles deep links, as shown below.12345678910111213<activity ...> ... <intent-filter android:autoVerify="true"> <action android:name="android.intent.action.VIEW" /> <category android:name="android.intent.category.DEFAULT" /> <category android:name="android.intent.category.BROWSABLE" /> <data android:scheme="http" android:host="YOUR_APP_CUSTOM_DOMAIN" /> <data android:scheme="https" android:host="YOUR_APP_CUSTOM_DOMAIN" /> </intent-filter> ... </activity>Warning
The added domain should match the information listed on the Airbridge dashboard.
Complete your project setup by referring to the Set up deep link callback.
To measure ad performance across the web and app, Airbridge collects the following user identifiers.
User Email: Email address
User Phone: Phone number
User ID: Unique User ID (The ID to identify a unique user must be the same in both web and mobile)
User Alias: Identifiers that can represent users (e.g., loyalty program ID, integrated ID used across affiliate organizations, etc.)
The user email and phone number are automatically hashed (SHA256) when sent to servers.
Follow the method below for the user identifier setup.
// Automatically hashed on client side using SHA256
// Can turn off hashing feature with special flag
Airbridge.getCurrentUser().setEmail("testID@ab180.co");
Airbridge.getCurrentUser().setPhone("821012341234");

// Does not hash
Airbridge.getCurrentUser().setId("testID");
Airbridge.getCurrentUser().setAlias("key", "value");

// Clear user data
Airbridge.expireUser()// Automatically hashed on client side using SHA256
// Can turn off hashing feature with special flag
Airbridge.getCurrentUser().email = "testID@ab180.co"
Airbridge.getCurrentUser().phone = "821012341234"
// Does not hash
Airbridge.getCurrentUser().id = "testID"
Airbridge.getCurrentUser().setAlias("key", "value")
// Clear user data
Airbridge.expireUser()Identifier | Description | Limitations |
|---|---|---|
| User email | Hashed by default |
| User phone number | Hashed by default |
| User ID | - |
| User alias | - Maximum 10 aliases |
Once the user identifier setup is complete, all events will be passed with the set identifier.
Additional user attributes can be collected for a more accurate multi-touch attribution and in-depth data analysis.
Airbridge.getCurrentUser().setAttribute("key", "value");Airbridge.getCurrentUser().setAttribute("key", "value")Name | Description | Limitations |
|---|---|---|
| User attribute | - Maximum 100 attributes supported |
The user information collected through the SDK can be found on the [Raw Data]>[App Real-time Log] page in the Airbridge dashboard.

Setup the Airbridge SDK to collect device alias when collecting events. The alias won't be deleted even after the user closes the app unless the user deletes the app.
Airbridge.setDeviceAlias("ADD_YOUR_KEY", "AND_YOUR_VALUE")
Airbridge.removeDeviceAlias("DELETE_THIS_KEY")
Airbridge.clearDeviceAlias()Airbridge.setDeviceAlias("ADD_YOUR_KEY", "AND_YOUR_VALUE");
Airbridge.removeDeviceAlias("DELETE_THIS_KEY");
Airbridge.clearDeviceAlias();Method | Description |
|---|---|
| Adds the key value pair to the device identifier. |
| Deletes the corresponding device alias. If there is no corresponding device alias, nothing is executed. |
| Deletes all device aliases. |
All events called by the Airbridge SDK can be sent with the following field values.
Name | Type | Description |
|---|---|---|
| String | Name of the event *Required |
| String | Event attribute 1 |
| String | Event attribute 2 |
| Number | Event attribute 3 |
| Map<String, Object> | Custom attributes |
| Map<String, Object> | Semantic attributes |
You can use the following method to send events through the Airbridge SDK.
Number eventValue = 10;
Map<String, Object> eventAttributes = new HashMap<String, Object>();
SemanticAttributes semanticAttributes = new SemanticAttributes();
semanticAttributes.put(SemanticAttributes.KEY_CURRENCY, "USD");
Airbridge.trackEvent(StandardEventCategory.HOME_VIEW, "event_action", "event_label", eventValue, eventAttributes, semanticAttributes);val eventValue = 10
val eventAttributes = mutableMapOf<String, String>()
val semanticAttributes = mutableMapOf<String, String>()
semanticAttributes[SemanticAttributes.KEY_CURRENCY] = "USD"
Airbridge.trackEvent(StandardEventCategory.HOME_VIEW, "event_action", "event_label", eventValue, eventAttributes, semanticAttributes)You can use the following method to send Custom Events other than the Airbridge Standard Events.
Number eventValue = 10;
Map<String, String> eventAttributes = new HashMap<String, String>();
Map<String, String> semanticAttributes = new HashMap<String, String>();
semanticAttributes.put(SemanticAttributes.KEY_CURRENCY, "USD");
Airbridge.trackEvent("event_category", "event_action", "event_label", eventValue, eventAttributes, semanticAttributes);val eventValue = 10
val eventAttributes = mutableMapOf<String, String>()
val semanticAttributes = mutableMapOf<String, String>()
semanticAttributes[SemanticAttributes.KEY_CURRENCY] = "USD"
Airbridge.trackEvent("event_category", "event_action", "event_label", eventValue, eventAttributes, semanticAttributes)For more details about semantic attributes supported by the Airbridge SDK, refer to this article.
Alternatively, you can pre-define classes and use them to send Custom Events.
class MyAppEvent extends Event {
    public MyAppEvent() {
        super("my_custom_category");
    }
}
...
Airbridge.trackEvent(new MyAppEvent());
...class MyAppEvent : Event("my_custom_category")
...
Airbridge.trackEvent(MyAppEvent())
...Airbridge.getCurrentUser().setEmail("me@sample.com");
Airbridge.getCurrentUser().setPhone("821012341234");
Airbridge.getCurrentUser().setId("12345");
Airbridge.getCurrentUser().setAlias("alias1", "value");
Airbridge.getCurrentUser().setAttributes("attr1", 1234);
Airbridge.trackEvent(StandardEventCategory.SIGN_UP);Airbridge.getCurrentUser().email = "testID@ab180.co"
Airbridge.getCurrentUser().phone = "821012341234"
Airbridge.getCurrentUser().id = "testID"
Airbridge.getCurrentUser().setAlias("alias1", "value")
Airbridge.getCurrentUser().setAttribute("attr1", 1234)
Airbridge.trackEvent(StandardEventCategory.SIGN_UP)Airbridge.getCurrentUser().setEmail("me@sample.com");
Airbridge.getCurrentUser().setPhone("821012341234");
Airbridge.getCurrentUser().setId("12345");
Airbridge.getCurrentUser().setAlias("alias1", "value");
Airbridge.getCurrentUser().setAttributes("attr1", 1234);
Airbridge.trackEvent(StandardEventCategory.SIGN_IN);Airbridge.getCurrentUser().email = "testID@ab180.co"
Airbridge.getCurrentUser().phone = "821012341234"
Airbridge.getCurrentUser().id = "testID"
Airbridge.getCurrentUser().setAlias("alias1", "value")
Airbridge.getCurrentUser().setAttribute("attr1", 1234)
Airbridge.trackEvent(StandardEventCategory.SIGN_IN)Airbridge.trackEvent(StandardEventCategory.SIGN_OUT);
Airbridge.expireUser();Airbridge.trackEvent(StandardEventCategory.SIGN_OUT)
Airbridge.expireUser()Airbridge.trackEvent(StandardEventCategory.HOME_VIEW);Airbridge.trackEvent(StandardEventCategory.HOME_VIEW)SemanticAttributes semanticAttributes = new SemanticAttributes();
semanticAttributes.setQuery("Coca Cola");
Airbridge.trackEvent(StandardEventCategory.SEARCH_RESULT_VIEW, null, null, null, null, semanticAttributes);val semanticAttributes = SemanticAttributes()
semanticAttributes.query = "Coca Cola"
Airbridge.trackEvent(StandardEventCategory.SEARCH_RESULT_VIEW, null, null, null, null, semanticAttributes)Product fanta = new Product();
fanta.setId("fanta_orange");
fanta.setName("FANTA Orange");
fanta.setQuantity(1);
fanta.setCurrency("usd");
fanta.setPrice(1.99);
fanta.setPosition(0);
Product cocacola = new Product();
cocacola.setId("cocacola_low_sugar");
cocacola.setName("Cocacola Low Sugar");
cocacola.setQuantity(1);
cocacola.setCurrency("usd");
cocacola.setPrice(2.99);
cocacola.setPosition(1);
SemanticAttributes semanticAttributes = new SemanticAttributes();
semanticAttributes.setProductListId("beverage_1");
semanticAttributes.setCurrency("usd");
semanticAttributes.setProducts(Arrays.asList(fanta, cocacola));
Airbridge.trackEvent(StandardEventCategory.PRODUCT_LIST_VIEW, null, null, null, null, semanticAttributes);val fanta = Product()
fanta.id = "fanta_orange"
fanta.name = "FANTA Orange"
fanta.quantity = 1
fanta.currency = "usd"
fanta.price = 1.99
fanta.position = 0
val cocacola = Product()
cocacola.id = "cocacola_low_sugar"
cocacola.name = "Cocacola Low Sugar"
cocacola.quantity = 1
cocacola.currency = "usd"
cocacola.price = 2.99
cocacola.position = 1
val semanticAttributes = SemanticAttributes()
semanticAttributes.productListId = "beverage_1"
semanticAttributes.currency = "usd"
semanticAttributes.products = listOf(fanta, cocacola)
Airbridge.trackEvent(
category = StandardEventCategory.PRODUCT_LIST_VIEW,
semanticAttributes = semanticAttributes
)Product fanta = new Product();
fanta.setId("fanta_orange");
fanta.setName("FANTA Orange");
fanta.setQuantity(1);
fanta.setCurrency("usd");
fanta.setPrice(1.99);
fanta.setPosition(0);
Product cocacola = new Product();
cocacola.setId("cocacola_low_sugar");
cocacola.setName("Cocacola Low Sugar");
cocacola.setQuantity(1);
cocacola.setCurrency("usd");
cocacola.setPrice(2.99);
cocacola.setPosition(1);
SemanticAttributes semanticAttributes = new SemanticAttributes();
semanticAttributes.setCurrency("usd");
semanticAttributes.setProducts(Arrays.asList(fanta, cocacola));
Airbridge.trackEvent(StandardEventCategory.PRODUCT_DETAILS_VIEW, null, null, null, null, semanticAttributes);val fanta = Product()
fanta.id = "fanta_orange"
fanta.name = "FANTA Orange"
fanta.quantity = 1
fanta.currency = "usd"
fanta.price = 1.99
fanta.position = 0
val cocacola = Product()
cocacola.id = "cocacola_low_sugar"
cocacola.name = "Cocacola Low Sugar"
cocacola.quantity = 1
cocacola.currency = "usd"
cocacola.price = 2.99
cocacola.position = 1
val semanticAttributes = SemanticAttributes()
semanticAttributes.currency = "usd"
semanticAttributes.products = listOf(fanta, cocacola)
Airbridge.trackEvent(
category = StandardEventCategory.PRODUCT_DETAILS_VIEW,
semanticAttributes = semanticAttributes
)Product fanta = new Product();
fanta.setId("fanta_orange");
fanta.setName("FANTA Orange");
fanta.setQuantity(1);
fanta.setCurrency("usd");
fanta.setPrice(1.99);
fanta.setPosition(0);
Product cocacola = new Product();
cocacola.setId("cocacola_low_sugar");
cocacola.setName("Cocacola Low Sugar");
cocacola.setQuantity(1);
cocacola.setCurrency("usd");
cocacola.setPrice(2.99);
cocacola.setPosition(1);
SemanticAttributes semanticAttributes = new SemanticAttributes();
semanticAttributes.setCartId("cart_123");
semanticAttributes.setProducts(Arrays.asList(fanta, cocacola));
semanticAttributes.setCurrency("usd");
Event event = new Event(StandardEventCategory.ADD_TO_CART);
event.setValue(4.98);
event.setSemanticAttributes(semanticAttributes);
Airbridge.trackEvent(event);val fanta = Product()
fanta.id = "fanta_orange"
fanta.name = "FANTA Orange"
fanta.quantity = 1
fanta.currency = "usd"
fanta.price = 1.99
fanta.position = 0
val cocacola = Product()
cocacola.id = "cocacola_low_sugar"
cocacola.name = "Cocacola Low Sugar"
cocacola.quantity = 1
cocacola.currency = "usd"
cocacola.price = 2.99
cocacola.position = 1
val event = Event(StandardEventCategory.ADD_TO_CART).apply {
value = 4.98
semanticAttributes = SemanticAttributes().apply {
cartId = "cart_123"
products = listOf(fanta, cocacola)
currency = "usd"
}
}
Airbridge.trackEvent(event)Product fanta = new Product();
fanta.setId("fanta_orange");
fanta.setName("FANTA Orange");
fanta.setQuantity(1);
fanta.setCurrency("usd");
fanta.setPrice(1.99);
fanta.setPosition(0);
Product cocacola = new Product();
cocacola.setId("cocacola_low_sugar");
cocacola.setName("Cocacola Low Sugar");
cocacola.setQuantity(1);
cocacola.setCurrency("usd");
cocacola.setPrice(2.99);
cocacola.setPosition(1);
SemanticAttributes semanticAttributes = new SemanticAttributes();
semanticAttributes.setProducts(Arrays.asList(fanta, cocacola));
semanticAttributes.setCurrency("usd");
semanticAttributes.setInAppPurchased(true);
Event event = new Event(StandardEventCategory.ORDER_COMPLETED);
event.setValue(4.98);
event.setSemanticAttributes(semanticAttributes);
Airbridge.trackEvent(event);val fanta = Product()
fanta.id = "fanta_orange"
fanta.name = "FANTA Orange"
fanta.quantity = 1
fanta.currency = "usd"
fanta.price = 1.99
fanta.position = 0
val cocacola = Product()
cocacola.id = "cocacola_low_sugar"
cocacola.name = "Cocacola Low Sugar"
cocacola.quantity = 1
cocacola.currency = "usd"
cocacola.price = 2.99
cocacola.position = 1
val event = Event(StandardEventCategory.ORDER_COMPLETED).apply {
value = 4.98
semanticAttributes = SemanticAttributes().apply {
products = listOf(fanta, cocacola)
currency = "usd"
inAppPurchased = true
}
}
Airbridge.trackEvent(event)Send an event through the SDK and check whether the event is available in the Airbridge dashboard.
Send an event through the SDK.
Navigate to [Raw Data]>[App Real-time Logs] and search for the event.

Depending on policies and environments, restrictions on collecting device IDs like GAID and IDFA may be required. When installing the Restricted SDK version, the device IDs are not collected. The Restricted SDK is supported in v2.22.2 and later.
Add the following code within the dependencies block in the app/build.gradle file instead of the existing library.
dependencies {
    ...
    implementation "io.airbridge:sdk-android-restricted:2.+"
    ...
}Library | Link |
|---|---|
Airbridge SDK restricted |
With the SDK Signature, you can ensure SDK spoofing prevention and use verified events for ad performance measurement. Call the setSDKSignatureSecret function above the initialization code.
AirbridgeConfig config = new AirbridgeConfig.Builder("YOUR_APP_NAME", "YOUR_APP_SDK_TOKEN")
        .setSDKSignatureSecret("YOUR_SDK_SIGNATURE_SECRET_ID", "YOUR_SDK_SIGNATURE_SECRET")
        .build();
Airbridge.init(this, config);val config = AirbridgeConfig.Builder("YOUR_APP_NAME", "YOUR_APP_SDK_TOKEN")
.setSDKSignatureSecret("YOUR_SDK_SIGNATURE_SECRET_ID", "YOUR_SDK_SIGNATURE_SECRET")
.build()
Airbridge.init(this, config)The SDK Signature Credentials are required for the SDK Signature setup. Refer to this article to learn how to create them.
If you want to send user identifiers without hashing, use the following method to disable hashing.
Attention
Privacy measures must be in place as this option allows sensitive personal information, such as
User EmailandUser Phone, to be accessed by third parties.
// Default User Info Hash Enabled = true
val option = AirbridgeOptionBuilder("YOUR_APP_NAME", "YOUR_APP_SDK_TOKEN")
    .setHashUserInformationEnabled(false)
    .build()
Airbridge.initializeSDK(this, option)// Default User Info Hash Enabled = true
AirbridgeOption option = new AirbridgeOptionBuilder("YOUR_APP_NAME", "YOUR_APP_SDK_TOKEN")
.setHashUserInformationEnabled(false)
.build();
Airbridge.initializeSDK(this, option);You can use the following method to set the Airbridge SDK to not send an App Open event again if a user relaunches the app within a set session time.
// Default Session Timeout = 5 minutes
AirbridgeConfig config = new AirbridgeConfig.Builder("YOUR_APP_NAME", "YOUR_APP_SDK_TOKEN")
    .setSessionTimeoutSeconds(300)
    .build();
Airbridge.init(this, config);// Default Session Timeout = 5 minutes
val config = AirbridgeConfig.Builder("YOUR_APP_NAME", "YOUR_APP_SDK_TOKEN")
.setSessionTimeoutSeconds(15)
.build()
Airbridge.init(this, config)The opt-in policy requires user consent before using user data.
Use the method below for collecting and transmitting data after obtaining consent for personal data tracking from users, especially when GDPR or CCPA applies.
// Default Auto Start Tracking Enabled = true
AirbridgeConfig config = new AirbridgeConfig.Builder("YOUR_APP_NAME", "YOUR_APP_SDK_TOKEN")
    .setAutoStartTrackingEnabled(false)
    .build();
Airbridge.init(this, config);

...

// Set a variable like below
if (properties.isGDPRAccepted) {
    Airbridge.startTracking();
}// Default Auto Start Tracking Enabled = true
val config = AirbridgeConfig.Builder("YOUR_APP_NAME", "YOUR_APP_SDK_TOKEN")
.setAutoStartTrackingEnabled(false)
.build()
Airbridge.init(this, config)
...
// Set a variable like below
if (properties.isGDPRAccepted) {
Airbridge.startTracking()
}Attention
The instructions below are optional. Proceed only if necessary.
The opt-out policy allows the use of user information until the user explicitly declines.
After setting the setAutoStartTrackingEnabled function to true, call the stopTracking function at a point where event data cannot be collected. From the moment the stopTracking function is called, the SDK will stop collecting events.
AirbridgeConfig config = new AirbridgeConfig.Builder("YOUR_APP_NAME", "YOUR_APP_SDK_TOKEN")
    .setAutoStartTrackingEnabled(true)
    .build();
Airbridge.init(this, config);

...

Airbridge.stopTracking();val config = AirbridgeConfig.Builder("YOUR_APP_NAME", "YOUR_APP_SDK_TOKEN")
.setAutoStartTrackingEnabled(true)
.build()
Airbridge.init(this, config)
...
Airbridge.stopTracking()It may be difficult to measure re-engagement if the Airbridge SDK collects all types of deep link events. The method below can be used to collect Airbridge deep link events only in the following cases:
When the app is opened through an
airbridge.iodeep linkWhen the app is opened through a
deeplink.pagedeep linkWhen the app is opened through an
abr.gedeep linkWhen the app is opened through a deep link with the Custom Domain that is set in the Airbridge dashboard
When the app is opened through a deep link that contains the
airbridge_referrerin the query
// Default Airbridge Link Only = false
AirbridgeConfig config = new AirbridgeConfig.Builder("YOUR_APP_NAME", "YOUR_APP_SDK_TOKEN")
    .setTrackAirbridgeLinkOnly(true)
    .build();
Airbridge.init(this, config);// Default Airbridge Link Only = false
val config = AirbridgeConfig.Builder("YOUR_APP_NAME", "YOUR_APP_SDK_TOKEN")
.setTrackAirbridgeLinkOnly(true)
.build()
Airbridge.init(this, config)Follow the steps below to use deferred deep linking in Meta ads. The Airbridge SDK collects the Meta deferred app links first above others. If there are no Meta deferred app links, Airbridge deferred deep links are collected.
Note that Meta ads' SKAN campaigns don't support Meta deferred app links. For more details, refer to the Meta ads document.
1. Add the following repository to the project/build.gradle file.
allprojects {
    ...
    repositories {
        ...
        mavenCentral()
        ...
    }
    ...
}
2. Add the following code under the dependencies block of the app/build.gradle file.
dependencies {
    ...
    implementation 'com.facebook.android:facebook-android-sdk:latest.release'
    ...
}
3. Add the following string in the app/res/values/string.xml file.
...
<string name="facebook_app_id">FACEBOOK_APP_ID</string>
<string name="facebook_client_token">FACEBOOK_CLIENT_TOKEN</string>
...
4. Add the following <meta-data> under the <application> element in the AndroidManifest.xml file.
...
<application android:label="@string/app_name" ...>
    ...
    <meta-data android:name="com.facebook.sdk.ApplicationId" android:value="@string/facebook_app_id"/>
    <meta-data android:name="com.facebook.sdk.ClientToken" android:value="@string/facebook_client_token"/>
    ...
</application>
...
5. Set the following option to true.
// Default Facebook Deferred App Link Enabled = false
AirbridgeConfig config = new AirbridgeConfig.Builder("YOUR_APP_NAME", "YOUR_APP_SDK_TOKEN")
    .setFacebookDeferredAppLinkEnabled(true)
    .build();
Airbridge.init(this, config);// Default Facebook Deferred App Link Enabled = false
val config = AirbridgeConfig.Builder("YOUR_APP_NAME", "YOUR_APP_SDK_TOKEN")
.setFacebookDeferredAppLinkEnabled(true)
.build()
Airbridge.init(this, config)Uninstall tracking using Firebase Messaging is supported by the Airbridge Android SDK
v2.6.0and later.
Airbridge sends a silent push daily between 3:00 PM and 4:00 PM (UTC) to users whose app event has been collected at least once in the last 6 months to check for uninstalls. Uninstall events can be monitored through Airbridge reports and raw data export files.
Refer to the article below for the detailed setup instructions.
You can use the following method to collect the user location information through the Airbridge SDK.
Attention
The collection of location information should be for legitimate purposes, requiring caution in its use.
// Choose one
<uses-permission android:name="android.permission.ACCESS_FINE_LOCATION" />
<uses-permission android:name="android.permission.ACCESS_COARSE_LOCATION" />
...// Default Location Collection Enabled = false
AirbridgeConfig config = new AirbridgeConfig.Builder("YOUR_APP_NAME", "YOUR_APP_SDK_TOKEN")
.setLocationCollectionEnabled(true)
.build();
Airbridge.init(this, config);// Default Location Collection Enabled = false
val config = AirbridgeConfig.Builder("YOUR_APP_NAME", "YOUR_APP_SDK_TOKEN")
.setLocationCollectionEnabled(true)
.build()
Airbridge.init(this, config)Attention
The Airbridge SDK collects the
LastKnownLocationdata. If the GPS information is not obtained, the value may not exist even if the corresponding permissions and settings are complete.
You can follow the methods below to track installs by different Android app stores, such as Google Play Store, One Store, Huawei Store, and Galaxy Store.
Input the app store name (e.g., playStore, oneStore, huaweiStore, galaxyStore) for andriod:value.
...
<application android:label="@string/app_name" ...>
    ...
    <meta-data android:name="co.ab180.airbridge.app_market_identifier" android:value="playStore"/>
    ...
</application>
...Input the app store name (e.g., playStore, oneStore, huaweiStore) for setAppMarketIdentifier.
AirbridgeConfig config = new AirbridgeConfig.Builder("YOUR_APP_NAME", "YOUR_APP_SDK_TOKEN")
    .setAppMarketIdentifier("playStore")
    .build();
Airbridge.init(this, config);val config = AirbridgeConfig.Builder("YOUR_APP_NAME", "YOUR_APP_SDK_TOKEN")
.setAppMarketIdentifier("playStore") // oneStore, huaweiStore ...
.build()
Airbridge.init(this, config)In the Actuals Report, select "Event Property" as a GroupBy to see the data by "App Market Identifier." Or you can go to the [App Raw Data] menu and request raw data export by selecting "App Market Identifier" as Event Property to see the data in the export file.
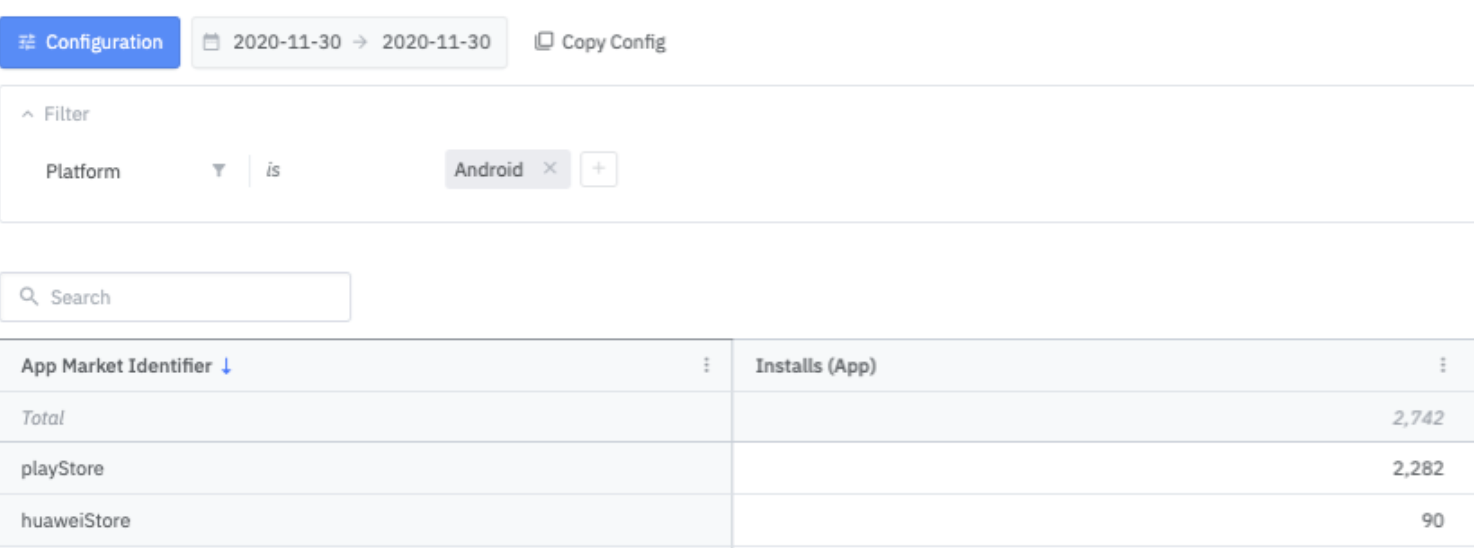
Installs by App Market Identifier
When unintended errors occur in the internal operations of the SDK, the error log is sent to the Airbridge server to use the data for future improvements. If you want to disable this feature, you can use the method below to prevent sending the error logs to the Airbridge server.
// Default Error Log Collection Enabled = true
AirbridgeConfig config = new AirbridgeConfig.Builder("YOUR_APP_NAME", "YOUR_APP_SDK_TOKEN")
    .setErrorLogCollectionEnabled(false)
    .build();
Airbridge.init(this, config);// Default Error Log Collection Enabled = true
val config = AirbridgeConfig.Builder("YOUR_APP_NAME", "YOUR_APP_SDK_TOKEN")
.setErrorLogCollectionEnabled(false)
.build()
Airbridge.init(this, config)When an event transmission failure occurs, the Airbridge SDK will store the event and retry at a later time. The following settings will allow you to limit the storage used for such events.
int count = 10;
long bytes = 1000000L;
AirbridgeConfig config = new AirbridgeConfig.Builder("YOUR_APP_NAME", "YOUR_APP_SDK_TOKEN")
    .setEventMaximumBufferCount(count)
    .setEventMaximumBufferSize(bytes)
    .build();
Airbridge.init(this, config);val count = 1_000
val bytes = 1_000_000L
val config = AirbridgeConfig.Builder("YOUR_APP_NAME", "YOUR_APP_SDK_TOKEN")
.setEventMaximumBufferCount(count)
.setEventMaximumBufferSize(bytes)
.build()
Airbridge.init(this, config)The storage size is slightly smaller than the actual data size due to metadata management and other factors.
Use the following method to set up event transmission intervals.
// Default Event Transmit Interval = 0 millisecond
AirbridgeConfig config = new AirbridgeConfig.Builder("YOUR_APP_NAME", "YOUR_APP_SDK_TOKEN")
    .setEventTransmitInterval(3000)
    .build();
Airbridge.init(this, config);// Default Event Transmit Interval = 0 millisecond
val config = AirbridgeConfig.Builder("YOUR_APP_NAME", "YOUR_APP_SDK_TOKEN")
.setEventTransmitInterval(3000)
.build()
Airbridge.init(this, config)Attention
The
IllegalArgumentExceptionruntime error will occur if thesetEventTransmitIntervalis set to a negative number.
The following code allows you to collect lifecycle events (ORGANIC_REOPEN, FOREGROUND) within the session timeframe.
AirbridgeConfig config = new AirbridgeConfig.Builder("YOUR_APP_NAME", "YOUR_APP_SDK_TOKEN")
    .setTrackInSessionLifeCycleEventEnabled(true)
    .build();
Airbridge.init(this, config);val config = AirbridgeConfig.Builder("YOUR_APP_NAME", "YOUR_APP_SDK_TOKEN")
.setTrackInSessionLifeCycleEventEnabled(true)
.build()
Airbridge.init(this, config)Clear the device's internal database of unprocessed events that have not been sent to Airbridge.
AirbridgeConfig config = new AirbridgeConfig.Builder("YOUR_APP_NAME", "YOUR_APP_SDK_TOKEN")
    .setResetEventBufferEnabled(true)
    .build();
Airbridge.init(this, config);val config = AirbridgeConfig.Builder("YOUR_APP_NAME", "YOUR_APP_SDK_TOKEN")
.setResetEventBufferEnabled(true)
.build()
Airbridge.init(this, config)Attention
When you set up the Airbridge Android SDK v2.18.0 or later to use tracking links within apps, every time a tracking link is used within the app, Deeplink Pageviews are aggregated, which are Target Events. The deep link performance may be affected when Deeplink Pageviews occur frequently right after Deeplink Opens.
The attribution window for Deeplink Pageviews is set to 3 days by default. If you want to change the attribution window for Deeplink Pageviews, contact your Airbridge CSM. If you don't have a dedicated CSM, contact the Airbridge Help Center.
You can use tracking links within the app. Note that custom domain tracking links with custom short IDs cannot don't function within the app. Use the method below to redirect users to specific in-app locations without sending them to an external browser.
Airbridge.click("https://abr.ge/~~~")
Airbridge.impression("https://abr.ge/~~~")When a user clicks on the tracking link within the app, the Airbridge.click function is called. A click event is collected, and the user is redirected to the configured app or web fallback path.
When a user engages with a tracking link within the app, the Airbridge.click function is called. An impression event is collected.
Meta Install Referrer (MIR) collection is supported by Airbridge Android SDK versions 2.22.3 or later. Follow the method below for the setup.
After the setup, you need to enter the decryption key into the Airbridge dashboard to view the decrypted Meta Install Referrer. Refer to this user guide to learn how to enter the decryption key.
AirbridgeConfig config = new AirbridgeConfig.Builder("YOUR_APP_NAME", "YOUR_APP_SDK_TOKEN")
    .setMetaInstallReferrer("YOUR_FACEBOOK_APP_ID")
    .build();
Airbridge.init(this, config);val config = AirbridgeConfig.Builder("YOUR_APP_NAME", "YOUR_APP_SDK_TOKEN")
.setMetaInstallReferrer("YOUR_FACEBOOK_APP_ID")
.build()
Airbridge.init(this, config)To comply with the Digital Markets Act (DMA), you must pass user consent data to Airbridge. For more information about the DMA and whether it applies to your service, see the Airbridge user guide.
If you are in the European Economic Area (EEA), you must always pass User Response information to Airbridge.
1. Confirm whether the end user launched the app in the EEA. If the end user did launch the app in the EEA (eea=1), confirm whether the consent values have already been stored for the session. If there are consent values stored, continue to Step 3.
If the end user launched the app from outside the EEA, it is not necessary to collect user consent.
Note
Airbridge cannot provide guidance on storing the user consent data and implementing the prompts. For assistance, consult legal professionals.
2. If there are no consent values stored, proceed to obtain user consent, such as with a privacy prompt. You must collect the adPersonalization and adUserData values in this step.
Airbridge Field Name |
Google Field Name |
Description |
|---|---|---|
<string> |
| Data indicating whether the user location is within the EEA or not - - |
<string> |
| Data indicating whether the user allowed data tracking for ad personalization - - |
<string> |
| Data indicating whether the user allowed data sharing with Google - - |
3. Initialize the Airbridge SDK and share the consent values with Airbridge before collecting the end user’s personal data.
Attention
Ensure to follow the instructions below.
Use the field names specified by Airbridge:
eea,adPersonalization,adUserDataInput
0or1following the consent data collected.
// MainApplication.kt
override fun onCreate() {
    super.onCreate()
    // Initialize Airbridge SDK
    val config = AirbridgeConfig.Builder("YOUR_APP_NAME", "YOUR_APP_SDK_TOKEN")
        // Make Airbridge SDK explicitly start tracking
        .setAutoStartTrackingEnabled(false)
        .build()
    Airbridge.init(this, config)

    // Set device alias into Airbridge SDK
    // Based on actual region
    Airbridge.setDeviceAlias("eea", "0" or "1")

    // Based on actual user consent
    Airbridge.setDeviceAlias("adPersonalization", "0" or "1")
    Airbridge.setDeviceAlias("adUserData", "0" or "1")

    // Explicitly start tracking
Airbridge.startTracking()// MainApplication.java
@Override
public void onCreate() {
super.onCreate();
// Initialize Airbridge SDK
AirbridgeConfig config = new AirbridgeConfig.Builder("APP_NAME", "APP_TOKEN")
// Make Airbridge SDK explicitly start tracking
.setAutoStartTrackingEnabled(false)
.build();
Airbridge.init(this, config);
// Set device alias into Airbridge SDK
// Based on actual region
Airbridge.setDeviceAlias("eea", "0" or "1");
// Based on actual user consent
Airbridge.setDeviceAlias("adPersonalization", "0" or "1");
Airbridge.setDeviceAlias("adUserData", "0" or "1");
// Explicitly start tracking
Airbridge.startTracking();
}Follow the method below to get the attribution result data through the Airbridge SDK.
AirbridgeConfig config = new AirbridgeConfig.Builder("YOUR_APP_NAME", "YOUR_APP_SDK_TOKEN")
	.setOnAttributionResultReceiveListener(new OnAttributionResultReceiveListener() {
		@Override
		public void onAttributionResultReceived(@NonNull Map<String, String> result) {
			// Process attribution data
		}
	})
	.build();
Airbridge.init(this, config);val config = AirbridgeConfig.Builder("YOUR_APP_NAME", "YOUR_APP_SDK_TOKEN")
.setOnAttributionResultReceiveListener(object : OnAttributionResultReceiveListener {
override fun onAttributionResultReceived(result: Map<String, String>) {
// Process attribution data
}
})
.build()
Airbridge.init(this, config)The table below lists the data fields that will be retrieved through the callback.
Field | Description |
|---|---|
attributedChannel | Channel (String) |
attributedCampaign | Campaign (String) |
attributedAdGroup | Ad Group (String) |
attributedAdCreative | Ad Creative (String) |
attributedContent | Content (String) |
attributedTerm | Keyword (String) |
attributedSubPublisher | Sub Publisher (String) |
attributedSubSubPublisher1 | Sub-sub Publisher 1 (String) |
attributedSubSubPublisher2 | Sub-sub Publisher 2 (String) |
attributedSubSubPublisher3 | Sub-sub Publisher 3 (String) |
If an event is unattributed, meaning that there is no attribution result, you will get the following response.
{
    "attributedChannel": "unattributed"
}
Guidelines for using attribution result data
Attribution data is forwarded within 40 seconds of SDK initialization.
If the app is closed and the attribution data cannot be received, the attribution data is forwarded within 40 seconds when the app is opened again.
On very rare occasions, it could take up to 5 minutes for the attribution data to be received.
When the attribution data does not exist
The attribution data will be sent when the app is opened again after at least three hours have passed since the SDK was initialized.
Note that it is not recommended to use the attribution data for real-time processing.
All Airbridge functions can be turned off using the following method.
AirbridgeConfig config = new AirbridgeConfig.Builder("YOUR_APP_NAME", "YOUR_APP_SDK_TOKEN")
    .setSdkEnabled(false)
    .build();
Airbridge.init(this, config);val config = AirbridgeConfig.Builder("YOUR_APP_NAME", "YOUR_APP_SDK_TOKEN")
.setSdkEnabled(false)
.build()
Airbridge.init(this, config)Attention
If
setResetEventBufferEnabledis set totrueandsetSdkEnabledis set tofalse, thesetSdkEnabledis prioritized andsetResetEventBufferEnabledisn't processed.
While basic events, such as Install, Open, Deeplink Open events can be automatically tracked by only installing the Android SDK in your hybrid app, in-app events, such as Sign-up, Purchase, etc., cannot be tracked as they are in-browser events that occur within a website of the WebView environment. Airbridge provides a simpler way to track in-app events by enabling the Android SDK to automatically pull all events from the Web SDK that is installed on the website of the WebView environment. This replaces the hassle of having to create bridge functions between native and WebView environments.
Attention
Before proceeding with the hybrid app setup, install the Android SDK and Web SDK.
Reference - Building Web Apps in WebView
Reference - Understanding Android WebView Javascript Interface
Call the Airbridge::setJavascriptInterface method in the target WebView as below.
public class MainActivity extends Activity {

    @Override
    protected void onCreate(Bundle savedInstanceState) {
        super.onCreate(savedInstanceState);
        setContentView(R.layout.activity_main);
        initWebView();
    }

    void initWebView() {
        webView = findViewById(R.id.webView);
        webView.getSettings().setJavaScriptEnabled(true);
        webView.getSettings().setDomStorageEnabled(true);

        Airbridge.setJavascriptInterface(webView, "YOUR_WEB_SDK_TOKEN");

        webView.setWebChromeClient(new WebChromeClient());
        webView.setWebViewClient(new WebViewClient());
        webView.loadUrl("http://dev.blog.airbridge.io/websdk-web-app/");
    }
}class MainActivity : Activity() {
override fun onCreate(savedInstanceState: Bundle) {
super.onCreate(savedInstanceState)
setContentView(R.layout.activity_main)
initWebView()
}
fun initWebView() {
webView.settings.javaScriptEnabled = true
webView.settings.domStorageEnabled = true
Airbridge.setJavascriptInterface(webView, "YOUR_WEB_TOKEN")
webView.webChromeClient = WebChromeClient()
webView.webViewClient = WebViewClient()
webView.loadUrl("http://my_company.com/main")
}
}You can find the YOUR_WEB_TOKEN on the [Settings]>[Tokens] page in your Airbridge dashboard.
Once the above setup is completed, initialize the Web SDK by following the Web SDK guide.
If you install the Airbridge SDK manually, you may encounter a compilation error due to a BillingClient dependency issue.
Starting from Airbridge SDK 2.26.1, a feature for collecting In-App purchase history has been added. To accommodate this, the SDK sets the In-App purchase library dependency as compileOnly, which does not cause issues during Gradle builds. However, when installed manually, a missing dependency may lead to compilation errors.
To resolve this issue, please refer to the following instructions.
dependencies {
    api fileTree(dir: 'libs', include: ['billingClient.aar'])
}GAID is being collected as 00000000-0000-0000-0000-000000000000 even though LAT (Limited Ad Tracking) is deactivated.
Open the AndroidManifest.xml file.
Follow the method below to add the
com.google.android.gms.permission.AD_IDpermission.
<manifest ...>
  ...
  <uses-permission android:name="com.google.android.gms.permission.AD_ID" />
  ...
</manifest>
For more details, refer to the Google Play Services document.
Deeplink Open events that occur through the push notifications generated by the Braze SDK are not collected by Airbridge. Instead, the App Open event is collected.
The Airbridge Android SDK uses the dataString in the action and intent of the Activity to distinguish between Deeplink Open events and App Open events.
When a user opens the app through a push notification using the Braze SDK, the app goes through an activity called NotificationTrampolineActivity. This activity handles push notifications, but the dataString is not included in its action and intent, preventing the SDK from determining if it's a Deeplink Open event or an App Open event.
The problem can be solved using the code snippet below for Airbridge Android SDK versions v2.21.5 and later.
AirbridgeConfig config = new AirbridgeConfig.Builder("YOUR_APP_NAME", "YOUR_APP_SDK_TOKEN")
    .setLifecycleIntegration(new AirbridgeLifecycleIntegration() {
    @Nullable
    @Override
    public String getDataString(@NotNull Activity activity) {
      if (activity.getClass().getName().equals("com.braze.push.NotificationTrampolineActivity")
          && activity.getIntent() != null
          && activity.getIntent().getExtras() != null) {
        return activity.getIntent().getExtras().getString("uri");
      }
      return null;
    }
  })
    .build();
Airbridge.init(this, config)val config = AirbridgeConfig.Builder("YOUR_APP_NAME", "YOUR_APP_SDK_TOKEN")
.setLifecycleIntegration {
it.takeIf { it.javaClass.name == "com.braze.push.NotificationTrampolineActivity" }
?.run { intent?.extras?.getString("uri") }
}
.build()
Airbridge.init(this, config)Although the deeplink.page has been deprecated in the Airbridge Android SDK v.2.21.1, for Airbridge Android SDK v2.21.0 or earlier, you can set up the intent-filter by following the steps below.
Open the
AndroidManifest.xmlfile.Add the following
intent-filterto theactivitythat will process deep links.
<activity ...>
    ...
    <intent-filter android:autoVerify="true">
        <action android:name="android.intent.action.VIEW" />
        <category android:name="android.intent.category.DEFAULT" />
        <category android:name="android.intent.category.BROWSABLE" />

        <data android:scheme="http" android:host="YOUR_APP_NAME.deeplink.page" />
        <data android:scheme="https" android:host="YOUR_APP_NAME.deeplink.page" />
    </intent-filter>
    <intent-filter android:autoVerify="true">
        <action android:name="android.intent.action.VIEW" />

        <category android:name="android.intent.category.DEFAULT" />
        <category android:name="android.intent.category.BROWSABLE" />

        <data android:scheme="http" android:host="YOUR_APP_NAME.airbridge.io" />
        <data android:scheme="https" android:host="YOUR_APP_NAME.airbridge.io" />
    </intent-filter>
    <intent-filter>
        <action android:name="android.intent.action.VIEW" />

        <category android:name="android.intent.category.DEFAULT" />
        <category android:name="android.intent.category.BROWSABLE" />

        <data android:scheme="YOUR_APP_URI_SCHEME" />
    </intent-filter>
</activity><activity ...>
...
<intent-filter android:autoVerify="true">
<action android:name="android.intent.action.VIEW" />
<category android:name="android.intent.category.DEFAULT" />
<category android:name="android.intent.category.BROWSABLE" />
<data android:scheme="http" android:host="YOUR_APP_NAME.deeplink.page" />
<data android:scheme="https" android:host="YOUR_APP_NAME.deeplink.page" />
</intent-filter>
<intent-filter android:autoVerify="true">
<action android:name="android.intent.action.VIEW" />
<category android:name="android.intent.category.DEFAULT" />
<category android:name="android.intent.category.BROWSABLE" />
<data android:scheme="http" android:host="YOUR_APP_NAME.airbridge.io" />
<data android:scheme="https" android:host="YOUR_APP_NAME.airbridge.io" />
</intent-filter>
<intent-filter>
<action android:name="android.intent.action.VIEW" />
<category android:name="android.intent.category.DEFAULT" />
<category android:name="android.intent.category.BROWSABLE" />
<data android:scheme="YOUR_APP_URI_SCHEME" />
</intent-filter>
</activity>According to @qwwdfsad, the use of kotlin-stdlib library v.1.3.70 and later is enforced when using kotlinx-coroutines-core library v1.3.5 and later.
Make sure that you use kotlin-stdlib library v1.3.70 and later if you're using kotlinx-coroutines-core library v.1.3.5 and later through the gradlew dependencies command.
The Airbridge SDK's AndroidManifest.xml includes rules to opt out of backing up the Shared Preferences data. This is done to prevent keeping the same Airbridge settings during reinstallation, ensuring that new installations or reinstalls can be detected accurately.
To merge the Airbridge SDK backup rules with your app backup rules and prevent conflicts, refer to the following instructions.
Below are the opt-out rules defined in the Airbridge SDK.
<?xml version="1.0" encoding="utf-8"?>
<data-extraction-rules>
    <cloud-backup>
        <exclude domain="sharedpref" path="airbridge-internal" />
        <exclude domain="sharedpref" path="airbridge-install" />
        <exclude domain="sharedpref" path="airbridge-user-info" />
        <exclude domain="sharedpref" path="airbridge-user-alias" />
        <exclude domain="sharedpref" path="airbridge-user-attributes" />
        <exclude domain="sharedpref" path="airbridge-device-alias" />
        <exclude domain="database" path="airbridge.db" />
    </cloud-backup>
    <device-transfer>
        <exclude domain="sharedpref" path="airbridge-internal" />
        <exclude domain="sharedpref" path="airbridge-install" />
        <exclude domain="sharedpref" path="airbridge-user-info" />
        <exclude domain="sharedpref" path="airbridge-user-alias" />
        <exclude domain="sharedpref" path="airbridge-user-attributes" />
        <exclude domain="sharedpref" path="airbridge-device-alias" />
        <exclude domain="database" path="airbridge.db" />
    </device-transfer>
</data-extraction-rules><?xml version="1.0" encoding="utf-8"?>
<full-backup-content>
<exclude domain="sharedpref" path="airbridge-internal" />
<exclude domain="sharedpref" path="airbridge-install" />
<exclude domain="sharedpref" path="airbridge-user-info" />
<exclude domain="sharedpref" path="airbridge-user-alias" />
<exclude domain="sharedpref" path="airbridge-user-attributes" />
<exclude domain="sharedpref" path="airbridge-device-alias" />
<exclude domain="database" path="airbridge.db" />
</full-backup-content>If you add android:fullBackupContent="string" in the AndroidManifest.xml, you might get the following error:
Manifest merger failed : Attribute application@fullBackupContent value=(string) from AndroidManifest.xmlTo fix this error, add tools:replace="android:fullBackupContent" in the <application> tag in the AndroidManifest.xml file.
If you add android:dataExtractionRules="string resource" in the AndroidManifest.xml, you might get the following error:
Manifest merger failed : Attribute application@dataExtractionRules value=(string resource) from AndroidManifest.xml
To fix this error, add tools:replace="android:dataExtractionRules" in the <application> tag in the AndroidManifest.xml file.
If you add android:allowBackup="false" in the AndroidManifest.xml, you might get the following error:
Manifest merger failed : Attribute application@allowBackup value=(false) from AndroidManifest.xml:32:9-36
	is also present at [:airbridge] AndroidManifest.xml:27:9-35 value=(true).
	Suggestion: add 'tools:replace="android:allowBackup"' to <application> element at AndroidManifest.xml:30:5-250:19 to override.
To fix this error, add tools:replace="android:allowBackup" in the <application> tag in the AndroidManifest.xml file.
Since the android:dataExtractionRules feature was added from API Level 31, you might get the following error if compileSdkVersion is less than 31:
AndroidManifest.xml: AAPT: error: attribute android:dataExtractionRules not found.To fix this error, add tools:remove="android:dataExtractionRules" in the <application> tag in the AndroidManifest.xml file.
If you are experiencing build errors caused by overlapping of the Airbridge SDK backup rules and third-party SDK backup rules, please refer to the workaround below.
e.g) If you have an Airbridge SDK backup rule and an Appsflyer SDK backup rule that overlap, you will see the build error below.
Attribute application@fullBackupContent value=(@xml/appsflyer_backup_rules) from [com.appsflyer:af-android-sdk:6.6.1] AndroidManifest.xml:14:18-73
is also present at [io.airbridge:sdk-android:2.14.0] AndroidManifest.xml:27:18-78 value=(@xml/airbridge_auto_backup_rules).
Suggestion: add 'tools:replace="android:fullBackupContent"' to <application> element at AndroidManifest.xml:7:5-13:19 to override.
To resolve this issue, please set up as follows.
Create a
src/main/res/xmlfolder.Within the created xml folder, create a file (e.g.
custom_backup_rules.xml).Add the data backup rules defined in the Airbridge SDK as follows.
<?xml version="1.0" encoding="utf-8"?>
<full-backup-content>
    <!-- Airbridge Backup Rules -->
    <exclude domain="sharedpref" path="airbridge-internal" />
    <exclude domain="sharedpref" path="airbridge-install" />
    <exclude domain="sharedpref" path="airbridge-user-info" />
    <exclude domain="sharedpref" path="airbridge-user-alias" />
    <exclude domain="sharedpref" path="airbridge-user-attributes" />
    <exclude domain="sharedpref" path="airbridge-device-alias" />
    <exclude domain="database" path="airbridge.db" />

    <!-- Appsflyer Backup Rules -->
    <exclude domain="sharedpref" path="appsflyer-data"/>

	<!-- Your Custom Backup Rules -->
</full-backup-content>Note
The data_extraction_rules.xml setting is required for Airbridge Android SDK v2.27.1 and above.
Within the created xml folder, create a file (e.g.
custom_data_extraction_rules.xml).Add the data backup rules defined in the Airbridge SDK as follows.
<?xml version="1.0" encoding="utf-8"?>
<data-extraction-rules>
    <cloud-backup>
        <!-- Airbridge Backup Rules -->
        <exclude domain="sharedpref" path="airbridge-internal" />
        <exclude domain="sharedpref" path="airbridge-install" />
        <exclude domain="sharedpref" path="airbridge-user-info" />
        <exclude domain="sharedpref" path="airbridge-user-alias" />
        <exclude domain="sharedpref" path="airbridge-user-attributes" />
        <exclude domain="sharedpref" path="airbridge-device-alias" />
        <exclude domain="database" path="airbridge.db" />

        <!-- Appsflyer Backup Rules -->
        <exclude domain="sharedpref" path="appsflyer-data"/>

	    <!-- Your Custom Backup Rules -->
    </cloud-backup>
    <device-transfer>
        <!-- Airbridge Backup Rules -->
        <exclude domain="sharedpref" path="airbridge-internal" />
        <exclude domain="sharedpref" path="airbridge-install" />
        <exclude domain="sharedpref" path="airbridge-user-info" />
        <exclude domain="sharedpref" path="airbridge-user-alias" />
        <exclude domain="sharedpref" path="airbridge-user-attributes" />
        <exclude domain="sharedpref" path="airbridge-device-alias" />
        <exclude domain="database" path="airbridge.db" />

        <!-- Appsflyer Backup Rules -->
        <exclude domain="sharedpref" path="appsflyer-data"/>

	    <!-- Your Custom Backup Rules -->
    </device-transfer>
</data-extraction-rules><manifest
...
xmlns:tools="http://schemas.android.com/tools">
<application
...
android:allowBackup="true"
android:fullBackupContent="@xml/custom_backup_rules"
android:dataExtractionRules="@xml/custom_data_extraction_rules"
tools:replace="android:fullBackupContent, android:dataExtractionRules"><manifest
...
xmlns:tools="http://schemas.android.com/tools">
<application
...
android:allowBackup="true"
android:fullBackupContent="@xml/custom_backup_rules"
tools:replace="android:fullBackupContent">HashMap<String, Object> semanticAttributes = new HashMap();
semanticAttributes.put("products", Arrays.asList(
// double brace initialization issue
new HashMap<String, Object>() {{
put("name", "MacBook Pro");
put("price", 1548200);
put("position", 1);
put("brandID", 23);
put("brandName", "apple");
}},
new HashMap<String, Object>() {{
put("name", "MacBook Air");
put("price", 1500000);
put("position", 2);
put("brandID", 23);
put("brandName", "apple");
}}
)
);
HashMap<String, Object> customAttributes = new HashMap();
customAttributes.put("customKey", "customValue");
Airbridge.trackEvent(
"purchase",
"action",
"label",
3048200,
customAttributes,
semanticAttributes
);The Android SDK uses Google's GSON library and there is a known issue regarding the double brace initialization. The product data may be missing when using double brace initialization for creating the product items as shown in the above Java code. Therefore, it is recommended to create the product items (e.g., Order Complete event) manually.
When updating the SDK, consider the content regarding versions between the previous version and the later version or your updated version.
For Airbridge Apps created after September 4, 2023, the issue in versions from v2.22.0 to v2.23.0 where the deep link URL provided in the deeplink callback was double-decoded from the content entered in the Airbridge dashboard has been resolved.
An initialization option has been added to stop event transmission when the app goes to the background.
You can stop event transmission when the app goes to the background using the
AirbridgeConfig#setTransmitEventOnBackgroundEnabledfunction.The default value is
true, and the remaining events are still transmitted in the background.
deeplink.page has been deprecated. From v2.21.1 onwards, it is recommended to use abr.ge as the deep link domain when writing code.
deeplink.page is still supported and functioning for backward compatibility.
The structure has been changed to not collect ORGANIC_REOPEN and FOREGROUND events that occur within the session time by default.
If you are using a version prior to v2.19.1 and are collecting ORGANIC_REOPEN and FOREGROUND events, you can continue to collect these events through the
AirbridgeConfig#setTrackInSessionLifeCycleEventEnabledfunction.The default value is
false, so ORGANIC_REOPEN and FOREGROUND events are not collected.
The BACKGROUND event has been removed.
When the user moves to a different in-app location, the DeeplinkMovement event is collected only when the Airbridge.click is called.
Was this page helpful?